Recently I needed to update a windows installer with a checkbox to opt in for a desktop shortcut. Sounds simple enough but this ended up to not be as straightforward as anticipated.
The installer is made using the excellent WiX Toolset. With WiX you have different types of installers which have their own layouts:
- setup projects: this builds ‘msi’ installers which optionally can show a user interface during install
- bootstrapper projects: this builds ‘exe’ installers which can bundle multiple other msi files. This is mostly used to bundle dependent frameworks like the .NET framework.
In my case only the bootstrapper displays a layout. The bundled setup projects are executed in the background without visible elements. When looking for solutions on the web there is some information on how to achieve the checkbox requirement for setup projects. There is however next to no information/documentation on how to do this in a bootstrapper project. The few titbits which I found were incomplete and often outdated or incorrect.
Bootstrapper setup
We’ll start by customizing the default bootstrapper layout. You can find the official documentation online here. My steps are documented below.
First you need to make sure the bootstrapper project has a reference to the WixBalExtension. This is normally added by default but if you don’t have this reference yet you can add it manually. Click ‘Add reference’ and browse to the WiX install path. (on my machine this is C:\Program Files (x86)\WiX Toolset v3.11\bin).
Next you need to add the theme files you want to use for layout. To start, copy one of the default templates of WiX which looks closest to the desired layout. In this example I’ll be working from the ‘HyperlinkTheme’. You can find these themes in the WiX install path under C:\Program Files (x86)\WiX Toolset v3.11\SDK\themes. Copy both the .wxl and .xml files to your project with build action ‘Content’. The .wxl file contains all the text used during the install and allows for localization. The .xml file contains all the windows and user interface elements which can be shown during install.
To start using your custom theme two things need to be added: the xml namespace for the BalExtension and references to your custom theme files by adding a WixStandardBootstrapperApplication. The Bundle.wxs file should look something like this example.
<?xml version="1.0" encoding="UTF-8"?>
<Wix xmlns="http://schemas.microsoft.com/wix/2006/wi"
     xmlns:bal="http://schemas.microsoft.com/wix/BalExtension">

  <Bundle Name="MyProject.Bootstrapper" Version="1.0.0.0" Manufacturer="Michiel Sioen" UpgradeCode="8e59407e-871d-4e9e-bbef-1d85c228b595">

    <BootstrapperApplicationRef Id="WixStandardBootstrapperApplication.HyperlinkLicense">
      <bal:WixStandardBootstrapperApplication
        LogoFile="res/logo.jpg"
        LicenseUrl="http://www.michielsioen.be"
        ThemeFile="res/MyCustomBootstrapperTheme.xml"
        LocalizationFile="res/MyCustomBootstrapperTheme.wxl" />
    </BootstrapperApplicationRef>

    <Chain>
      <MsiPackage Id="Setup" SourceFile="$(var.MyProject.Setup.TargetPath)" Compressed="yes" />
    </Chain>

  </Bundle>
</Wix>
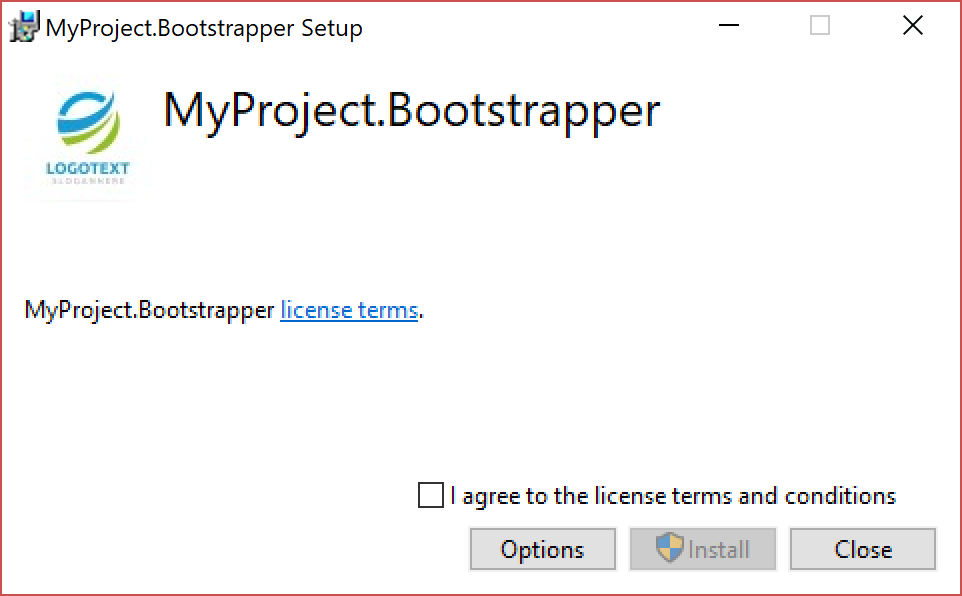
Which results in the following default layout.

Customizing the layout
At this point we can start updating the theme.xml file. The installer is separated in pages which contain UI elements. Every element has an identifier, a location, a size and content. Positive coordinates mean that the x and y values start counting from the top-left of the window. Negative coordinates start from the bottom-right. The initial ‘Install’ page is the first page which is shown during install. By default this is defined in the following way:
<Page Name="Install">
    <Hypertext Name="EulaHyperlink" X="11" Y="121" Width="-11" Height="51" TabStop="yes" FontId="3" HideWhenDisabled="yes">#(loc.InstallLicenseLinkText)</Hypertext>
    <Checkbox Name="EulaAcceptCheckbox" X="-11" Y="-41" Width="260" Height="17" TabStop="yes" FontId="3" HideWhenDisabled="yes">#(loc.InstallAcceptCheckbox)</Checkbox>
    <Button Name="OptionsButton" X="-171" Y="-11" Width="75" Height="23" TabStop="yes" FontId="0" HideWhenDisabled="yes">#(loc.InstallOptionsButton)</Button>
    <Button Name="InstallButton" X="-91" Y="-11" Width="75" Height="23" TabStop="yes" FontId="0">#(loc.InstallInstallButton)</Button>
    <Button Name="WelcomeCancelButton" X="-11" Y="-11" Width="75" Height="23" TabStop="yes" FontId="0">#(loc.InstallCloseButton)</Button>
</Page>
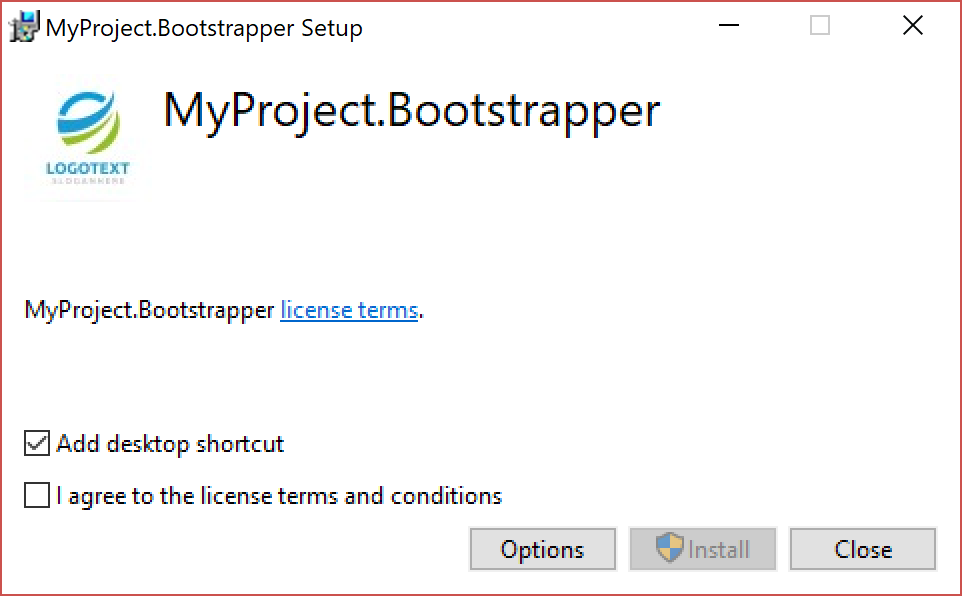
We want to add an extra checkbox on this page. To make it look slightly better I’ll also update the location of the eula accept checkbox to have both checkboxes aligned on the left.
To re-align the eula checkbox we only need to change the x coordinate from being negative to positive. To add our new checkbox we can insert a new ‘checkbox’ element with a new, distinct name. By changing the y value the checkbox is positioned above the eula checkbox. The text to show next to the checkbox should be added to the theme.wxl file as a new string reference. For other themes or pages, it might be necessary to update the position and sizing of other elements as well to avoid overlap.
The resulting xml and installer look like this:
<Page Name="Install">
    <Hypertext Name="EulaHyperlink" X="11" Y="121" Width="-11" Height="51" TabStop="yes" FontId="3" HideWhenDisabled="yes">#(loc.InstallLicenseLinkText)</Hypertext>

    <!-- Start changes -->
    <Checkbox Name="AddDesktopShortcut" X="11" Y="-67" Width="-11" Height="17" TabStop="yes" FontId="3" HideWhenDisabled="yes">#(loc.InstallDesktopShortcut)</Checkbox>
    <Checkbox Name="EulaAcceptCheckbox" X="11" Y="-41" Width="260" Height="17" TabStop="yes" FontId="3" HideWhenDisabled="yes">#(loc.InstallAcceptCheckbox)</Checkbox>
    <!-- End changes -->

    <Button Name="OptionsButton" X="-171" Y="-11" Width="75" Height="23" TabStop="yes" FontId="0" HideWhenDisabled="yes">#(loc.InstallOptionsButton)</Button>
    <Button Name="InstallButton" X="-91" Y="-11" Width="75" Height="23" TabStop="yes" FontId="0">#(loc.InstallInstallButton)</Button>
    <Button Name="WelcomeCancelButton" X="-11" Y="-11" Width="75" Height="23" TabStop="yes" FontId="0">#(loc.InstallCloseButton)</Button>
</Page>
Interacting with the checkbox
By this point we’ve added a new element to the layout but we’re not doing anything with it yet. To use the checkbox for a shortcut we need to capture the checkbox value in the bootstrapper project and pass it on to the msi installer. The installer, in turn, has to check on this value before adding a shortcut to the desktop.
To pass on this value we create a new variable inside of the bundle. The checkbox is reference with the name defined in the page xml in between square brackets. This new variable can then be passed on to the setup file with a MsiProperty.
<!-- variable to capture checkbox value -->
<Variable Name="AddDesktopShortcutMsiVariable" bal:Overridable="yes" Value="[AddDesktopShortcut]" />

<!-- pass our variable to the msi -->
<MsiPackage Id="Setup" SourceFile="$(var.MyProject.Setup.TargetPath)" Compressed="yes">
  <MsiProperty Name="AddDesktopShortcut" Value="[AddDesktopShortcutMsiVariable]" />
</MsiPackage>
In the WiX setup project we can reference this MsiProperty. Note that you need to capitalize the property name, otherwise it doesn’t work. The checkbox value returns 1 if it was selected or nothing if it wasn’t selected.
Shortcut elements are usually added as a child element of a file. It’s impossible however to make the shortcut conditional if written that way. This means the shortcut has to be separated out to a separate component, which can have a condition tag.
<!-- Conditional shortcut component-->
<Component Id="DesktopShortcutComponent" Guid="*">
  <RegistryValue Id="RegShortcutDesktop" Root="HKCU" Key="SOFTWARE\MyProject\1.0\settings" Name="DesktopSC" Value="1" Type="integer" KeyPath="yes" />
  <Shortcut Id="desktopSc" Target="[INSTALLFOLDER]\$(var.MyProject.TargetFileName)" Directory="DesktopFolder" Name="MyProjectShortcut" Icon="MyProductIcon" IconIndex="0" WorkingDirectory="INSTALLFOLDER" Advertise="no"/>
  <RemoveFolder Id="RemoveShortcutFolder" On="uninstall" />
  <Condition>ADDDESKTOPSHORTCUT=1</Condition>
</Component>
A full example project can be found on GitHub.
